Installing CentOS 6.3 in VirtualBox
Requirements:
CentOS 64-bit ISO : Download Link (~330 MB) this is minimum version
Virtual Box : Download Link (~90 MB)
At least 8 GB -of free disk space
Installation steps:
First, thing you need to do is to set up your VirtualBox. Download and install Virtual Box.
Press “New“, Type as “CentOS 64 bit” or anything you want. Set the type as “Linux“, Version as “Red Hat 64 bit“. And press “Next”.

Allocate “Memory ” to 512 Mb or 1024 MB . You can increase this value according to requirements. And Press”Next“.

Then select “Create a virtual Hardisk Now” and press “Create“.

Then choose “VDI” which is the first option, and press “Next“.

Then choose “Dynamically allocated“

Choose the amount of hard disk space you want to allocate for your CentOS system. Select atleast 8Gb-10GB . I have allocated 20 GB. And press “Create“.

You would see the Virtual Box Home Screen. Now Press on “Start“.

Then press the small folder icon and choose the CentOS ISO file you have downloaded earlier. And then press “Start“.


Wait for a few seconds and you will see the CentOS boot menu. Now, select the first option “Install or upgrade an existing system“. And press “Enter” in your keyboard.

Now , it will take a few seconds to load.

[Note: To scroll through different options, you can either use the Arrow keys in your keyboard or the TAB key to move through different options . You may also use SPACE bar in your keyboard or ENTER key to make selections]
Now, you will probably get a message box saying “Disk Found” and if you want to verify the contents in the CD. Press “Skip” as you are installing from an ISO file. If you need, you can press “OK” and verify the contents but it might take a while.

You would see a message “Welcome to CentOS” and then press “OK“.

Select the language and press “OK“.

Select the model of the keyboard or just leave it to the default value. then press “OK“.

If you get a “Warning Message” such as the one below, just choose “Re-initialize all“.

Then select your time zone and (Press TAB) and then “OK“.

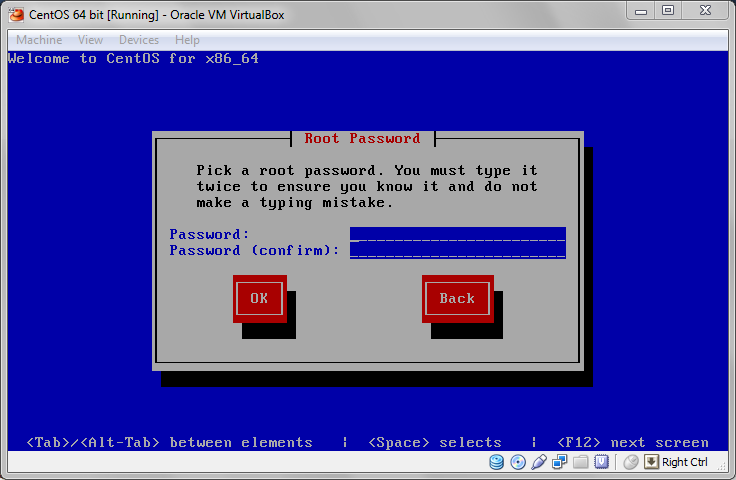
Now, you will need to enter a password. This will be the password for the root user (or Administrator password). Then select “OK“. {Remember you can use the arrow keys or TAB to move through different fields or options in the screen}.
Now, select “Use entire drive” and then press “OK“.

Now, press “Write changes to disk“.

Now, it will begin installing CentOS. It might take a while for it to complete.


After, it is done installing , you will see a message saying “Congratulations, your CentOS installation is complete“. Select “Reboot” and hit ENTER.

It will reboot now, and you will see the CentOS booting screen.


Now, you will see the login prompt as shown in the picture below. Now, Type the login as “root” and password as the password you entered during the setup.

After successful login you will see a prompt as shown below with # symbol at the end.

And voilà ! You have successfully installed CentOS in your Virtual Box.
This is a minimal mode CentOS and so many application packages are not installed. You will also have to configure the network to access the internet.
[UPDATE: To configure network in CentOS, I have made a detailed guide with screenshots, you can find it here.]
If you have any sort of queries on regarding this installation, just leave a comment and will get back at you. Don’t forget to follow my blog to get future updates!
refer to: http://extr3metech.wordpress.com/2012/10/25/centos-6-3-installation-in-virtual-box-with-screenshots/
Since you need to install GuestsAdditions in host machine, and before you can install that, you have to update gcc, make and kernel-devel headers, you need to connect to the internet so that you can do these updates.
Now we are going to explore how to configure the network connections in CentOS 6.4.
This is a guide on configuring network in CentOS in Virtual Box with screenshots (using terminal).
So, here I have used CentOS 6.3 minimal and will be discussing on configuring the Virtual Box and CentOS for network access. If you need help installing CentOS minimal in the Virtual Box, you can find the instructions in my earlier post here.
Requirements:
Virtual Box
CentOS 6.3 or 6.4
Step 1: Configure Virtual Box Network Settings:
There are different modes or ways you can configure your Virtual box network settings.
Not Attached
NAT
Bridged Adapter
Internal Network
Host-Only Adapter
Generic Driver
You can find more details about the different modes here.
I will be using the Bridged Adapter mode for this guide. It is faster as it treat the VM as an individual host within the network.
Open Virtual Box and right click on your CentOS VM, and click on “Settings“.

Now, go to the tab Network and change the “Attached to” field to “Bridged Adapter”. Then choose the “Name” to your network interface. For example, I have a dell wireless adapter, so I choose the Name as “Dell Wireless” from the drop down menu. And finally check the field “Cable Connected”. Finally, click on OK when you are done.

So, you have now configured the Virtual Box. Now, you can start your CentOS VM by selecting you VM and clicking on “Start”.

Step 2: Configure CentOS network settings:
You can configure your network either by using Dynamic IP addressing assigned by your DHCP server or you can manually configure your IP Address statically. You can choose either static or dynamic method and can do so by editing the file /etc/sysconfig/network-scripts/ifcfg-eth0.
Method 1: Dynamic IP
We can configure the network by using Dynamic IP address which are assigned automatically by the DHCP server. This is the simplest way to configure your network.
NOTE: You will have a line that starts with HWADDR in the your config file, do not change or modify that line.
In your terminal, type the following:
vi /etc/sysconfig/network-scripts/ifcfg-eth0
Now, add/modify the file as follows (DO NOT CHANGE the HWADDR line your config file):
DEVICE=eth0
BOOTPROTO=dhcp
ONBOOT=yes
NM_CONTROLLED=no
HWADDR=08:00:27:08:47:E9
Now, save the file by pressing “ESC” and typing :wq and hit ENTER.
To view your network config file. type the following in the terminal:
cat /etc/sysconfig/network-scripts/ifcfg-eth0

Now, you will have to restart your network. You can do so by typing the following in the terminal:
service network restart

To view your IP address, type the following in your terminal:
ifconfig eth0
You can see your IP Address of the interface eth0 next to the field “inet addr:” as shown below:

Now, if you have internet access, then you can check if you are able to ping any website. And you should be able to get the reply. For example, in your terminal type:
ping extr3metech.wordpress.com

You can press CTRL+ C to stop the ping command.
So, Hurray! you have successfully setup up your network in your CentOS Virtual Box.
Method 2: Static IP
We can also assign the network information manually by assigning the IP Address, NETMASK , GATEWAY in the network interface config file.
NOTE: You will have a line that starts with HWADDR in your config file, do not change or modify that line.
Step1 : In you terminal, type:
vi /etc/sysconfig/network-scripts/ifcfg-eth0
Now, edit/merge the file to the following
DEVICE=eth0
BOOTPROTO=static
ONBOOT=yes
NM_CONTROLLED=no
HWADDR=08:00:27:08:47:E9
IPADDR=192.168.1.30
NETMASK=255.255.255.0
GATEWAY=192.168.1.1
Now, press ESC and type :wq and hit ENTER to save and exit the configuration file.
To view the config file. type the following in the terminal:
cat /etc/sysconfig/network-scripts/ifcfg-eth0

Step 2: Change Host name:
To change host name , you have to edit the config file /etc/sysconfig/network. If you want to know to change the host name manually, you can follow the guide I have posted earlier here.
Step 3: Assign DNS Server IP
To manually assign primary and secondary DNS Server IP addresses, in your terminal type:
vi /etc/resolv.conf
Now, edit this file to the following:
nameserver 8.8.8.8
nameserver 8.8.4.4
Now, press ESC and type :wq and hit ENTER to save and exit the configuration file.
Now, if you want you can make sure you have entered and saved the correct configuration(It is a good practice to double check
cat /etc/resolv.conf

Step 4: Restart network:
Finally, all you have to do is to restart your network service. To so so, type the following in the terminal:
service network restart
Now, you can check your Current IP configuration, by typing the following in the terminal:
ifconfig eth0

Now, if you have internet access, then you can check if you are able to ping any website. And you should be able to get the reply. For example, In your terminal type:
ping extr3metech.wordpress.com
You can press CTRL+ C to stop the ping command.
So, Hurray! you have successfully setup up your network manually in your CentOS Virtual Box.
Hope this guide helped you to configure network in your CentOS Virtual Machine.
If you have any queries or suggestions regarding this guide, feel free to leave a comment and will get back at you. Don’t forget to follow my blog to get future updates!
refer to: http://extr3metech.wordpress.com/2013/05/23/configuring-network-in-centos-6-3-virtual-box-screenshots/
Once we are able to get connected to the internet, we now need to do the updates so that we can install GuestsAdditions.
1. This will require installing some prerequisites. In theory, the following should work
yum install dkms binutils gcc make patch libgomp glibc-headers glibc-devel kernel-headers kernel-devel
yum install kernel-devel-2.6.32-279.11.1.el6.i686
or simply
# Install the packages required
yum update
yum install gcc kernel-devel make
2. reboot
3.Mount the ISO image with the guest additions, enter /media
mkdir /media/cdrom
mount /dev/cdrom /media/cdrom
4. Install guest additions
/cdrom/VBoxLinuxAdditions.run
5. Share a folder from the VirtualBox control panel, giving it a shareName.
now we should be able to see there is a file called sf_shareName in the directory
ls /media/sf_share_name
6. You could always mount the directory yourself as well
mkdir /a_folder_name
mount -t vboxsf the_shareName /a_folder_name
or: mount -t vboxsf HostSharedFolder G uestSharedFolder
No comments:
Post a Comment